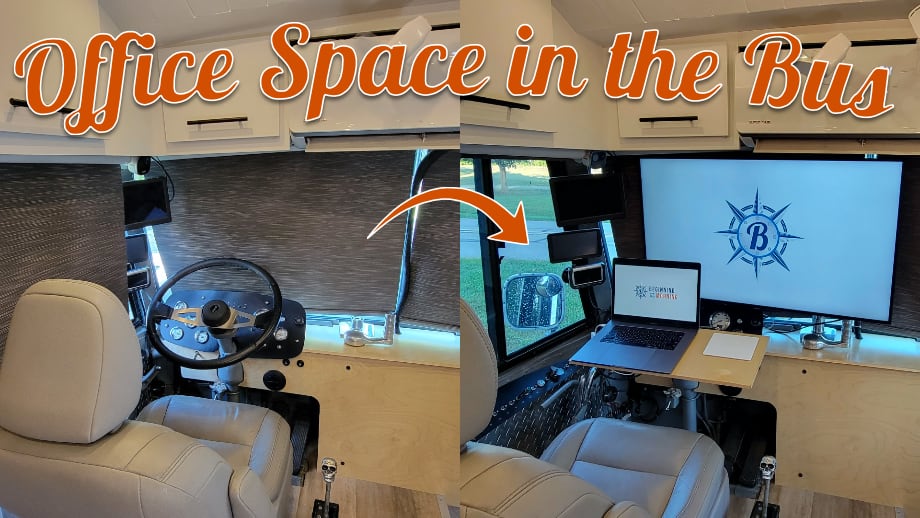
After finishing the lower bunk beds, we were ready and excited to move up to the top bunks. Like we explained previously, we are using 2" x ⅛” angle iron to build the bed rails in order to maximize vertical space. It’s thin but strong and will allow us to
Kids' Bunk Room: Part 1 - Lower Bunks
We’ve had a vision for this bus from the beginning. We knew we could take it out of the dreary, outdated cowboy theme from 1980 and turn it into a modern, comfortable home for our family. While we have made many, many steps in that direction already, building out
Curved Planked Ceiling in the Kids' Room & Wiring the Lights
When we first bought the bus, the ceilings were covered in a dingy fabric/carpet type material commonly called “mouse fur”. It was gross. That’s all I can say about that. Gross! I imagined bright, clean white wood planks. While we quickly ripped out those old “mouse fur” panels,
Wall Treatment in the Kids' Room
Every time we get to cover up more of the “ugly” in the bus, it’s an exciting day. When we started covering the bare metal, insulation, and furring strips on the walls, it was a very good day. The shell of the kids’ room was just beginning to come
Building the Rear Wall with Built In Bookshelves
It was an exciting day! We finally were ready to start building the kids’ bunk room in the back of the bus. Making a space for our four kids feels extra special - they are extra special. We had all been looking forward to working on this room that will
Installing a Diesel Heater
After finishing the kitchen countertops, we planned to start work on building out the kids’ bedroom in the rear of the bus. The first project we worked on was installing the diesel heater.
Diesel heaters are great for an RV for several reasons. First and foremost, they provide dry heat.
Macerator Pump & Sanitizing the Fresh Water Tank
After moving our work space out to my uncle’s shop with no power and water, we had to put a few things in place to make it work for us. Power hasn’t been a problem because of our battery and solar. We had all of the plumbing done
We've Moved
Funny thing about YouTube videos...no one necessarily knows when they were recorded, only when they were published. For our family, creating videos and blog posts only comes after our normal jobs, homeschooling, family time, and actually building the bus. That leads to our posts being months behind where we
Butcher Block Countertops: Part 2
After cutting and fitting the butcher block counters, we were ready to finish them. We have never had butcher block countertops in our home before, so I had been researching and researching the best ways to do the finish work. The most concerning part for me was having them around
Butcher Block Countertops: Part 1
The kitchen is the heart of the home...and also the heart of the bus. The kitchen is inches from the family room and about four feet from the kids’ room. It will function as a food prep area, laundry room, art table, work desk, school desk, and who knows
Plumbing Leak Testing (with SeeLevel II Tank Monitor Setup)
A couple of weeks ago, we shared the installation of the washer/dryer in the kitchen of the bus. We were getting anxious to get started on the countertop, but we needed to test the plumbing to the washing machine before we covered it all up with the counter. Before
Building a Vanity Cabinet
Project management has been one of the most mentally difficult parts of building this bus. Namely, in what order do we do different parts of the build? In real life, it’s not very concise. We cannot realistically do all of any one major project at once. It has often
Splendide 2100 XC Install and Test Drive (including power & water usage)
When we first started researching the idea of becoming full-time RVers, one of the lifestyle questions we had was, “What about laundry?” As we began to read more about the day to day life of a fulltime RVer, we learned the pros and cons of the laundry options.