


We want to give a huge thank you to all the folks who take the time to provide feedback and advice on our build. Thank you! We read every comment and consider every idea. When folks bring up potential issues with safety, we pay particularly close attention. A couple of these suggestions were posted this week.
The first suggestion centered around our choice for DC breakers. In our previous post, we detailed all the components we were using as well as how it would all be wired together. We implemented the diagram on a board and made custom cables to connect everything up. A couple people mentioned that we might want to reconsider our choice for breakers. Well, upon reevaluation, we discovered a couple of things.
A strange thing about the breakers we bought is they said "48 Volts Max", which is different than "for 48 Volt systems". Of course, we didn't really notice this until AFTER we bought them and someone brought it up. It is a little surprising because as a common practice when you buy something "for a 12 Volt system", it is generally accepted that the Voltage will run up to about 15 Volts when charging the battery. I guess this is not the case with these particular DC breakers. Another thing that tipped us off was when re-researching breakers, we came across a website with a bright red warning on similar 48V breakers that stated "These breakers are rated for a maximum of 48 volts DC. However, they are not to be used on a 48-volt system because the system voltage will actually rise above 48 volts". I am a curious fella, so I called and spoke to the shop and, sure enough, they said DO NOT use these breakers on a system that will exceed 48 Volts.
So now I had a little issue. I looked high and low for a surface mount breaker that would accept voltages higher than 48 Volts. I couldn't find any. In fact, some of the breakers only accepted a max voltage of 42 Volts. In the suggestions, they had mentioned that Blue Sea made some really nice stuff that operated at higher voltages. I looked them up and sure enough, they offered some DC breakers that went as high as 80 Volts. Midnight Solar also had some higher Voltage circuit breakers. I just couldn't find them in the right Amperage rating for similar formats. In the end, we ended up going with the Blue Sea breakers. Specifically two 7250 single pole 100 Amp DC breakers and one 7269 double pole 200 Amp DC breaker.

One slight issue - all the higher voltage breakers were "panel mount". This means they are designed to screw into a panel from the front (with the switch sticking through).
Well, I guess we are going to be fabricating some stuff. This proved to be pretty challenging, but it was no match for Michelle with the calipers and Sharpie.


 Once those were fabricated and we could mount the circuit breakers to them, we needed a way to secure them. We decided to fabricate some 3-inch stand-offs to secure with 4-inch lag bolts from Lowe's.
It took us nearly all day but we do feel better that the Voltages are in line with what we expect out of our system.
The second suggestion that we wanted to address was to find a way to isolate the two lugs on the 2 AWG wires feeding our A/C subpanel. They are really close together, and the concern is that if they wiggle at all while driving, the lugs could touch causing a short. A few suggestions were made with how to address this. Loctite was a common suggestion as well as possibly using a piece of rubber to ensure that if the wires did get loose they would not short.
 When we removed the nuts, we were surprised to discover that we couldn't move the cables much at all. The cables are secured coming into the inverter by a strain relief and are so stiff that they didn't even move when we applied a significant amount of force to them. That was good news and relieved some of the concern, but we decided to go ahead and provide some additional insurances as well.
The Loctite was a no-brainer, however, we struggled a little bit with trying to cut a piece of rubber from an old inner tube to the right size and secure it with a zip tie. We finally ditched the inner tube idea and used a much more substantial piece of rubber that we had used as a floor material for the water bay. It fit nearly perfectly and proved easy to secure with a zip tie.


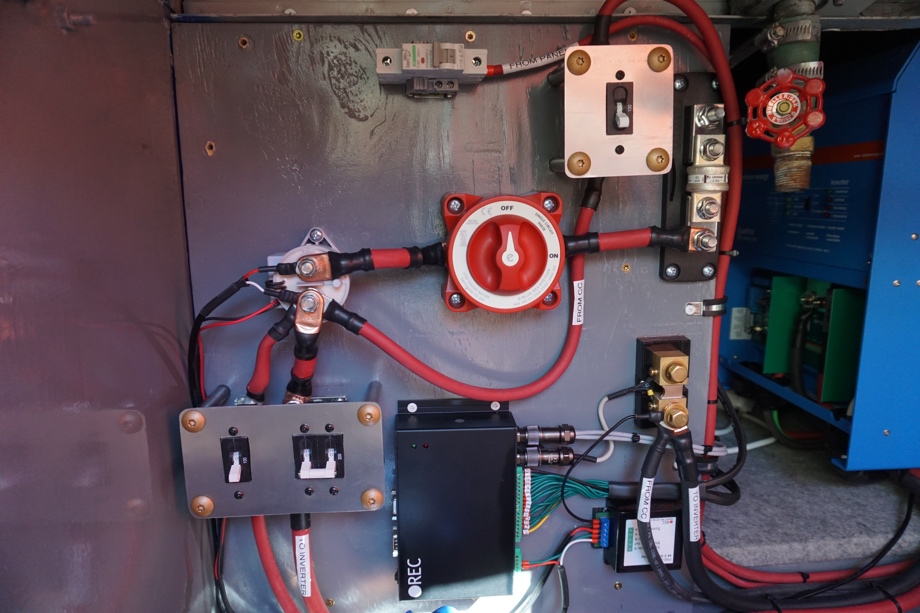
One last mod was made as a result of hearing back from REC - the company that we bought our BMS from. My original design had two contactors. One "main" contactor would cut power to the entire system if anything went wrong. The second contactor would cut off power from the solar panels to the solar controller if the battery state of charge was too high. I had planned on controlling this via a programmable "charging" relay built into the REC BMS. REC got back to me this week and said that the Color Control GX is actually a better way to manage the solar controller.
As a result, I have removed the secondary contactor and will run the panels only through the breaker. This also meant that I needed to rerun the solar charge controller output cable to the other side of the main contactor.

When we created our YouTube channel and blog, our desire was to create an atmosphere where the viewers and readers are joining us in what we are building. A place where we can document what we are doing and how we are doing it, so that maybe in 10 or 20 years our kids can look back and relive these moments with us. We wanted to give the viewers and readers the feeling that we are all working on a project together, just like my dad and I did while working on weekend projects together. We didn't start this project with the intention of completely redoing the bus. We wanted to maybe redo a bedroom for the kids, change out the furniture and floors, and slap on some paint. The best laid plans... In all of this, what we have found has been so much more than just "hanging out together" working on a project. We are have found an encouraging and helpful community, for which we are so grateful. You make suggestions, ask questions, and introduce us to ideas and products we may not be aware of, often saving us from some costly mistakes, making our bus that much safer. So, from the bottom of our hearts, thank you for joining us on this crazy adventure.
Watch the video:
Click here If you cannot see the video.
Parts We Used
Blue Sea 7250 C-Series 100 Amp DC Circuit Breaker from PKYS.com
Blue Sea 7269 200 Amp DC Circuit Breaker from PKYS.com
An old 20" inner tube from my little girl's bike


Tools we used
Calipers
Sharpie pens
Blue Loctite


0 Comments
Comments powered by Disqus