


A couple of weeks ago, we shared the installation of the washer/dryer in the kitchen of the bus. We were getting anxious to get started on the countertop, but we needed to test the plumbing to the washing machine before we covered it all up with the counter. Before we did that, however, we had to wrap up a few final plumbing components down in the water bay.
We installed an outdoor shower by mounting it to a piece of aluminum angle and gluing that down to the top of our water heater. Honestly, we don’t love this RV outdoor shower and may look for something a little more robust in the future, but it will do for now.


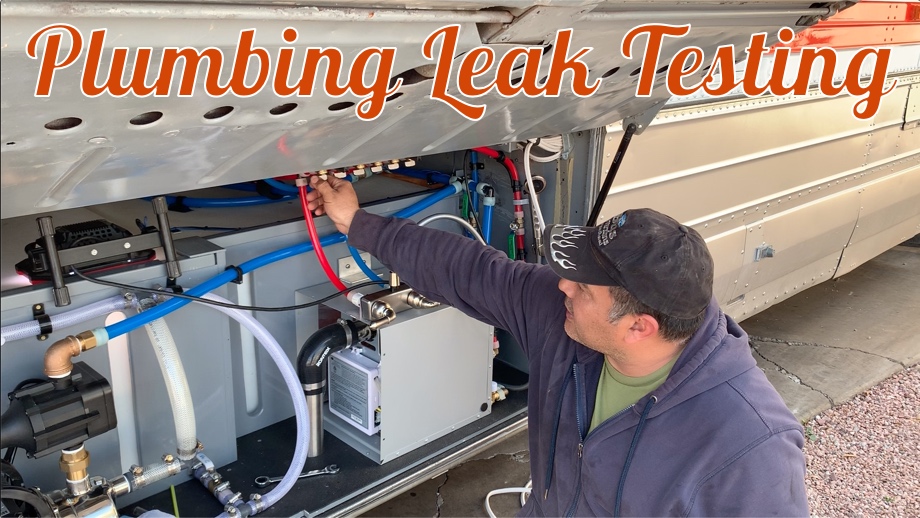
Next, we ran the Pex lines to our hot and cold manifold.


Then, we roughed in the Pex line that will be for our hot water return line from the shower. This will return the cold water to the fresh tank while waiting for the hot water to reach the showerhead. Can’t waste a drop of water.
Finally, we made a freshwater tank vent that we eventually covered with a piece of fine wire mesh to keep bugs out. Also attached into the vent port on the freshwater tank, we plumbed in the waste line for a Reverse Osmosis system we will use for drinking water (more on that in the future).

After finishing up down in the water bay, we were finally ready to start testing all of this plumbing we had been working on for so long. Would it actually work the way we planned? Would there be leaks?
We bought an RV drinking water hose and hooked it up from our house to the inlet and got started. For the first round of testing, we bypassed the fresh tank and simply used the system as if on “city water hookups”.
 We started with every valve closed, and opened everything one piece at a time to check for leaks. First, each water filter housing, then through to the city water valve, then to the manifolds. So far, so good. No leaks.


Then, it was time to start testing individual “circuits” from the manifold. We only had three of our six “circuits” actually plumbed - the washing machine, the bathroom sink, and the outdoor shower. We first tested the outdoor shower, both hot and cold lines, and there were no leaks and everything worked well. Next, we turned on the washing machine. We checked everything for leaks, none! The washing machine filled with water, just like it was supposed to - phew! We drained the water out of the washer and that worked, too, with no leaks. Finally, we tested the bathroom sink. No leaks there either. Hallelujah! Round one of testing went great.


For the next round of testing we filled the tank and ran everything off the pump. To start, we had to test out the electronic valve for our tank-fill. We don’t have that wired up yet, so we just temporarily hooked it up with jumper cables to our bus starter batteries in the bay next door. It worked well and began filling the tank.


Since this was the first time we had ever put water in the tank, we thought it would be a good time to also set up and test our SeeLevel II tank monitors. The video goes through the process of the initial set up, which is pretty simple. We have a viewport to manually check the levels of our tanks, so we compared what we could see from the side of the tank with what the monitor was reading. It seemed spot on. The SeeLevel II reads the tanks in 2% increments, and it was great to be able to watch the monitor detect the water filling to such a high resolution (compared to the standard RV ⅓, ⅔, full type monitors). We do think we may get an additional monitor to have down in the bay to watch while we are filling it up in case no one is inside the bus at the time to watch.

We filled the tank to about 50% and then prepared to turn on the pump for the first time. Because we had never turned it on before, we needed to prime the pump. It took about 64oz of water to get it primed and then when we plugged it in and opened the valve between the pump and manifold, it immediately started working perfectly. Here is where we found our first (and only so far) leak. It was just barely seeping from the brass fitting between the pump and its head unit. Since it was just a very minor leak, we decided to move on with the testing and address that leak when we were finished.


We again opened up the manifold valves for our different water circuits, and the pressure and flow were great! No leaks anywhere else. Round two of water testing was mostly a success. We just had that one minor leak that we will show you how we ended up fixing in a video in the future (with a couple of other fixes on the bus we have had to make as well).
Overall, we are so happy with how the plumbing has turned out. Our system is working as designed and didn’t have any major issues. We are calling that a success (so far).
Now that we know there are no water leaks behind the washing machine, we can go ahead and get started on the kitchen countertops. That’s what will come next week.
Watch the video:
Click here If you cannot see the video.

0 Comments
Comments powered by Disqus