


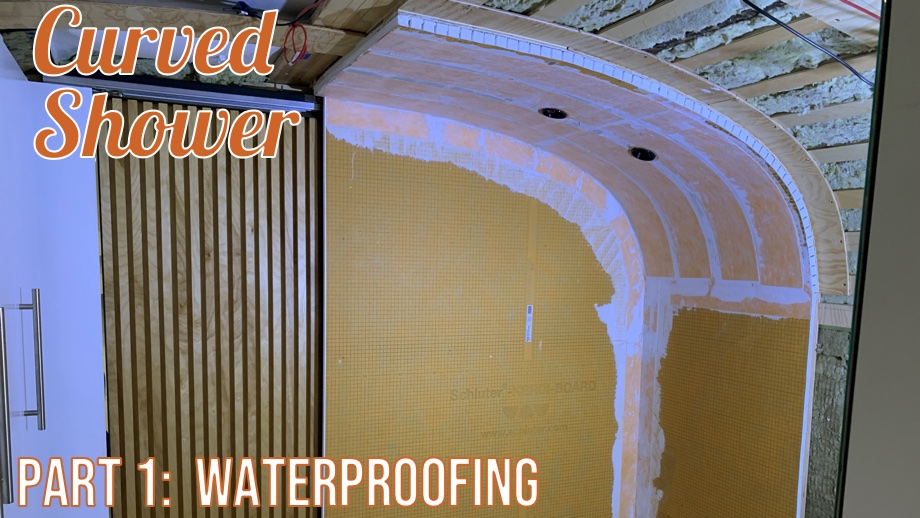
The time has finally come to finish the last room in the bus. The bathroom. Previously in the bathroom, we built our closet and vanity, installed and plumbed our tub, built a tub surround, and installed the toilet. The time finally came to take care of the walls and ceiling - specifically for this project, the shower walls and ceiling. After quite a lot of research, we decided to use KerdiBoard and Kerdi V-Board to waterproof our shower walls and curved ceiling.
Pretty early on in the bus build, we decided to use ¾” plywood interior walls, instead of traditional 2x4 framing. This is how the bus had been built in the previous conversion that lasted over 30 years - and that was actually with ⅝” walls. Many other bus converters have used this method successfully over the years, and it seemed to make sense to us to save quite a bit of space. However, when it came time to waterproof the shower, we hit a bit of a snag.
 Plywood walls coupled with a very narrow lip on the bathtub to work with combined with needing lightweight materials left us with a bit of a challenge.
We knew we wanted to use a lightweight waterproofing material instead of a traditional heavy concrete board. Schluter Kerdi products came to our attention early on in our planning, but we did not research the nitty-gritty details. We had seen that they had a thin waterproofing membrane and thought that would be perfect to waterproof over the plywood while working with our very narrow bathtub lip. As the time drew nearer to making final plans and buying products, we found out that the membrane cannot be installed over plywood because it is considered a non-stable substrate. We had to use the thicker board.
The other reason we were very interested in the Kerdi products was that they have a board that is notched to allow it to be applied to curved surfaces - Kerdi V-Board. This is exactly what we needed to waterproof the shower ceiling.
 We contacted Schluter to ask a lot of questions and ended up speaking on the phone with the area representative, Tim. When we told him what we were doing, he was excited for us and answered all of our questions and confirmed that we could indeed use the KerdiBoard, but not the Kerdi Membrane, over plywood. He also answered many of our questions about the V-Board. Since curved showers are not super-fashionable, we hadn’t been able to find out much information about it online. We were really thankful Tim gave us the go-ahead with our ideas.
Great! We were getting somewhere finally. Well, the thinnest board they offer is 3/16”, and of course, the local box stores that sell it do not carry that size. They also did not carry the V-board. They even told me they could not order it for us. I looked on Kerdi’s website for other distributors in our area and found a small local tile and flooring store listed. I called and talked with Steve and Jake at The Flooring Outfit in Mesa, AZ and they have been so awesome! They ordered everything we needed for us and even went to bat so we wouldn’t have to order 10 sheets as Schluter requires. We only needed 1 sheet of each size, and they made it happen. Then, when we went and picked it up, they were so kind, giving us all kinds of tips and tricks of the trade. They even told us to just bring the bus down to their parking lot and do it there if we wanted so if we needed help, we could ask. We were certainly ready to do just that if things went south during installation. Ha!
Finally, after what felt like a lot of roadblocks leading up to this, we were finally ready to start the project. With the curved ceiling, we have found that making templates from craft paper saves us from making a bunch of mistakes on our actual materials. So, we did just that for the first back wall with a curved top. We traced the template onto the KerdiBoard and cut it with a razor blade. Thankfully, it fit really well.


We applied similar techniques to cutting the Board for the side wall and the V-Board for the ceiling. One thing to note - we used ½” KerdiBoard on the side wall to transition into the ¾” V-Board on the ceiling because there was a ¼” difference in the plywood wall to ceiling. So, we were hoping this would smooth out that transition. We cut holes in the ceiling boards for lights, and we were almost ready to start the installation.

We had one more small piece to cut for the little bench area where our faucet handles are. We cut that out and cut holes for the faucet valves, and then we were finally ready to go.
We used Schluter All-Set Mortar and mixed it in small batches, following the instructions exactly. Mix for 5 minutes, slake (let it sit) for 10 minutes, mix for 3 more minutes. The two younger kids loved helping with the mixing. We were glad for the help. One of the things that Tim told us was that because we were applying it over plywood, we should fully embed the board to the wall (completely cover the wall with thin-set - another option for other substrates is to just spot-cover it). Juan got started applying the thin-set and notching it with the ⅛” Kerdi Trowel. We applied thin-set and installed the panels one at a time, making sure to wiggle the boards side to side a bit to really cinch it in there. On the V-Board, you have to apply thin-set into all the grooves of the back side before you put it up. Then, we went over the boards with the rubber float pushing it into the thin-set and making sure everything was nice and flat and even.


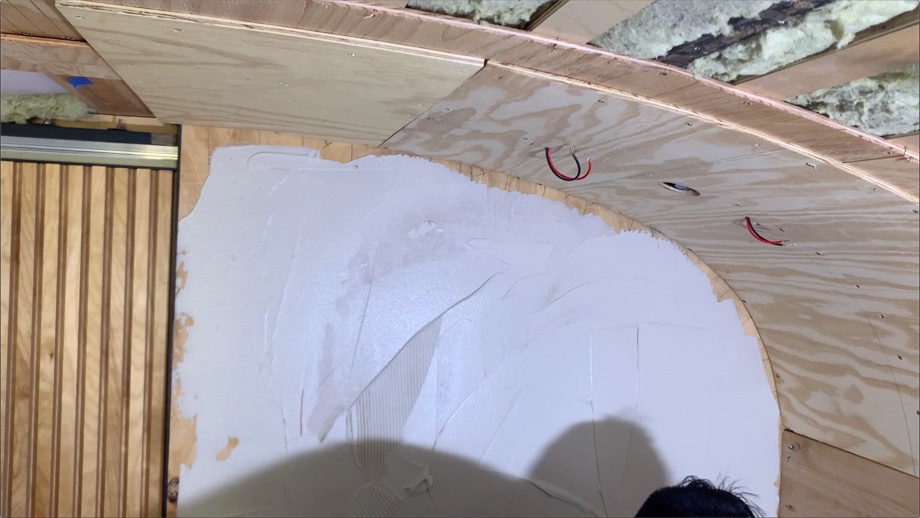
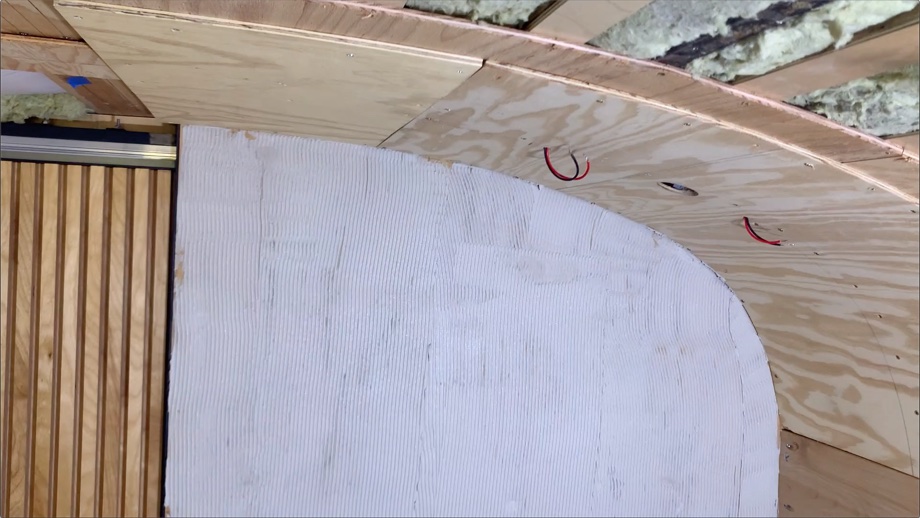
On the ceiling, it was recommended to add screws in addition to just the thin-set. Again, following instructions we screwed in the V-Board with Kerdi ZT Washers and our own screws (the ones that can come with the washers were too long for us) every six inches.

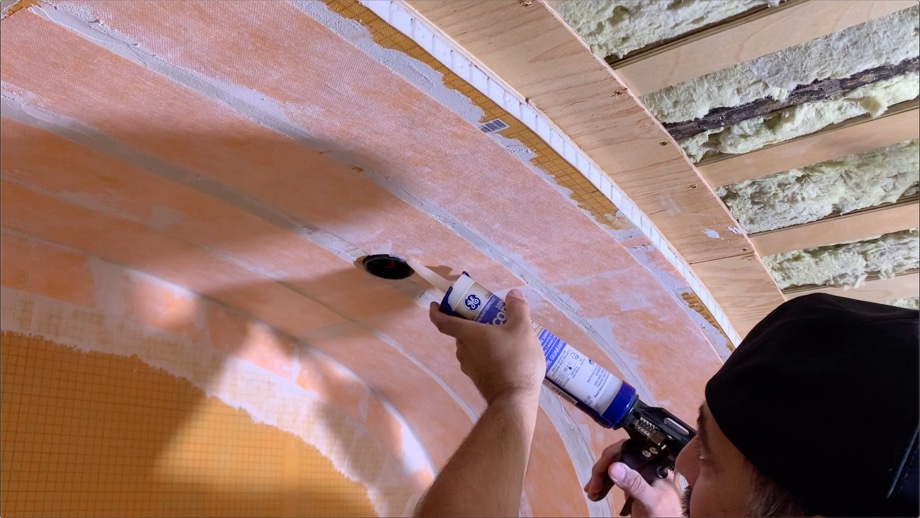
Next, we used the thin-set to apply Kerdi Band over all of the seams and all of the screws. On the curved seam, I had to make a cut, fold, and overlap the edges just a bit to get the band to lie flat.


Last, we 3D printed some cups to screw into the ceiling and give us something to anchor our lights into. A bit of silicone around the edge of those, and we were fully waterproofed.


You may have noticed that finishing the bathroom is one of the last big projects we have left. There’s a reason why it has been left until near the end. We were nervous. I am not sure why this (and the tiling to come) seemed more intimidating to us than all of the other projects we have done. Maybe because we know if not done well, it will not only look bad but could cause major water damage in our home. Well, after finishing up this waterproofing step, we felt pretty confident that water will not be able to go where we don’t want it. We needed that boost of confidence because next up was actually tiling the shower.

Disclaimer: I just realized that this post sounds like it’s sponsored. Kerdi, Kerdi, Kerdi. Nope, we have never done any kind of sponsorship. We paid all of our own dollars for all of this. We just needed a lot of help to both acquire the products and figure it all out. So, thank you to Tim at Schluter and Steve and Jake at The Flooring Outfit for helping us figure all this stuff out.
Watch the video:
Click here If you cannot see the video.


0 Comments
Comments powered by Disqus