


It is May 2023, and we are back in Arizona for many family events and the usual "life upkeep". Our oldest son Dominic graduated high school and starts attending college at Arizona State University in the fall, so we have a lot to prepare for him moving out. Along with the usual doctors' appointments, dentist appointments, well care check-ups, we also have Dominic scheduled for wisdom teeth extraction and a bunch of other projects to get done that will likely keep us in Arizona the entire summer.
While our current air conditioner setup works great as we travel and are in temperatures under 105°F, summer in Phoenix is well over that for months. When we were here for a few weeks last summer, we noticed that our bus has trouble keeping a cool temperature inside once the temperature rises above 105°F in direct sunlight. The area that's most affected is the center of the bus near the kitchen. We have an excellent 12k BTU mini-split air conditioner in the front that works quietly and efficiently and a high-efficiency 5k BTU air conditioner in the back that works great for the kids' room. However, we don't have any cooling in the center, which is already at a disadvantage with its large windows, ice maker, microwave, coffee machine, and refrigerator - all of which contribute to the heat. Usually, this isn't an issue for us as we tend to aim for destinations with mild weather (between 60-85°F). This summer, however, it looks like we'll be staying home to face the weather. It is time to consider adding more air conditioning to the bus - at least temporarily.
We faced a similar issue when we were building the bus. Even though we had all our air conditioners going, it was still not enough to keep the bus cool in the Arizona heat. At that point, we used a portable 8K BTU unit that a friend had given to us, and it worked well to knock off that extra bit of heat. However, it was always in the way, and we had to find a way to route the big exhaust tube out of the bus. It was a constant struggle. Now that the bus is finished we can no longer realistically fit one of those portable units inside nor do we want a similar experience to the one we had before.

We are extremely satisfied with our 12K BTU mini split and have even considered getting another one. However, due to the plumbing and size of the outside unit, it would be impractical to install another. We have been exploring the possibility of finding a window-type unit that can match the efficiency and quietness of a mini-split. After conducting some research, we were pleased to discover that Midea offers such a unit. Their u-shaped mini split window units offer inverter-driven, variable speed compressors and variable speed fans. They were voted most efficient for their class in 2020 and advertise a super quiet operating rating of just 42 dB. A little further digging revealed that the 12K BTU unit they offer only pulls 800-1000 Watts when maximum cooling. This is the perfect unit for us!

The only downside? The cost of course. These units retail for $500. For a temporary summer solution, this seemed a little steep for us. We opted to look on Craigslist to see if we could at least find a decent high-efficiency window unit. To our surprise, we found the exact Midea U-shaped mini split unit we were looking for, AND it was only $150! Of course, the ad read, "Works great and puts out cold air but makes high pitch noise".

The location for the Midea unit was only about twenty minutes away, so we scheduled some time to go look at it. The seller plugged it in and let us see that it was working and blowing cold air. It was VERY noisy, and the noise was high-pitched resembling a jet engine winding up. At this point, we turned on the blower only by selecting "Fan Only" from the "Modes". This did not quiet the noise down at all, so we had a fairly good idea that the problem was in the blower of the unit. The unit was also EXTREMELY dirty and it looked like it had been stored outside. Although it blew cold air we were not 100% sure we could fix it or how much fixing it would cost. After some consideration, we decided to offer him $100 for the air conditioner. He readily accepted the offer, and we loaded it up. To our surprise, it came with all the manuals, the framework for the window, and even a brand-new remote control with batteries still sealed in plastic
These units are fairly new to the market, so there are not an abundance of YouTube videos on them. We managed to find a single video that had a loud blower, and the creator of that video was able to get his quiet again using a washer, an o-ring, and some grease. After thoroughly cleaning the unit and dismantling most of the front section, we tried the washer trick with no success. We then completely removed the motor and powered it up to ensure that it was the source of the noise. We verified that the motor was the source of the noise, so the next step was to find a motor.

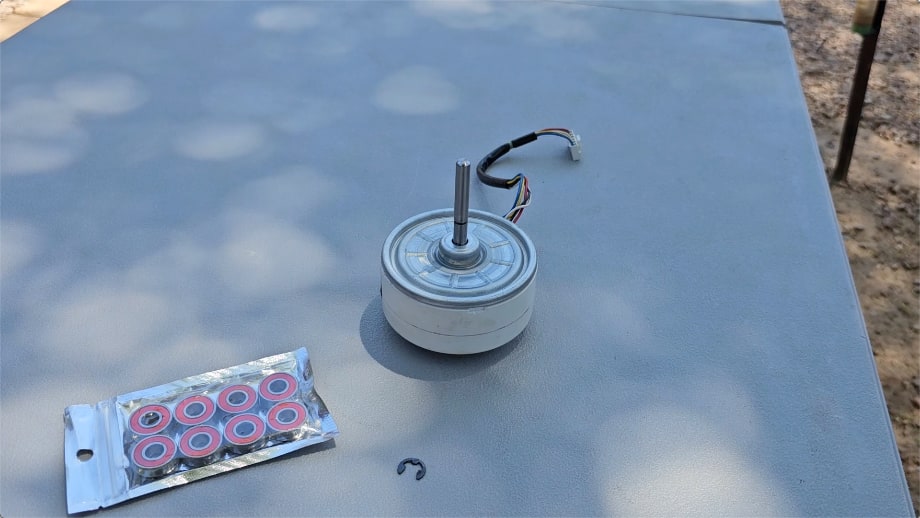
We could not find the EXACT match on the motor, but we did find some pretty expensive options when we tried to search by air conditioner model. We ran across a forum post that suggested the motor could be found on Amazon for less than $50. The part# we got to reference was RD-310-13-8. When we looked up this number we found quite a few motors that fit that description. We verified as many of the parameters as we could: Rotation (->), Speed (1400 RPM), Voltage (DC 310V), Amperage (0.06A), and Power (13 Watts) all matched.
At the same time, we saw on the same forum that people were replacing the bearings in these motors with some inexpensive skateboard bearings and reporting that this fixed the noise issue for them. The bearings were only $5.99 and set to arrive the same day, so we figured we would give that a try as well. If we could fix it for $6 we might just keep the motor for a spare in case it ever went bad.
The bearings arrived, so we set out to fix our motor. The first challenge was just getting the motor apart. The ones we saw on YouTube the lids all came off fairly easily and cleanly. This was not the case with ours - our lid was glued on and chipped and broke as we tried to remove it. Strike 1.

After we removed the lid, we inspected the motor and saw that we needed to remove the small circuit board inside to be able to get at the bearings. Unfortunately, the solder-sucker tool is back at the shop so we opted to wick the solder away with some copper wire. This took a long time and we still needed to clean the holes in the circuit board for reassembly. Strike 2.

We faced quite a challenge when it was time to remove the bearings after successfully loosening the motor shaft. Upon removal, we observed that the rubber piece holding the rotor had shifted significantly on the shaft due to our struggle with the old bearings. Despite successfully fixing the rotor back in place, we noticed that the new bearings did not fit like the old ones. They were not tight on the shaft, and we could slide them on and off with little effort. Strike 3.
We soldered everything back together and put it back as best as we could but had little hope for it working. To nobody's surprise, the motor did not spin when we applied power.
When the new motor arrived we checked the specs, size, rubber components, and pin-outs. Everything seemed to indicate we would have no problem getting this new motor to work. We quickly assembled everything and held our breath as we hit the power button. To our delight, the motor worked perfectly! It was quiet!

Now that we had a fully working and quiet air conditioner, we just had to find a place in the bus to install it.
When we first built the bus, we had plans to bring our 21-year-old cat, Stretch. We decided that since we didn't need the refrigerator vent for the refrigerator (we upgraded from a propane/120V model to a residential model), we would make that area the "kitty litter" area. The large vent would allow us to easily service the litter box from outside and hopefully keep the mess contained and it is vented. Unfortunately Stretch died about a year and a half into our build. We ended up building a small divider wall in that space and just using it as another cabinet for storage.

We decided to open this area back up by removing the divider wall. We were able to fit the new air conditioner in that space. The space is more than big enough, but in order to get good efficiency out of our unit, we needed to be sure that the cool air it is producing is not just sucked back into the compressor side and blown out the side of the bus. For this, we used a piece of insulation foam where the window normally goes on this unit. Luckily with this installation, when the hot summer is over and we get back to traveling, we can easily remove and store this unit, put the divider wall back in place, and have our storage available again.


The Midea unit has been in for a few weeks now, and it works surprisingly well. Standing in the kitchen right in front of it, the air is super cold. I think we are ready for those 110-115°F degree days now!
Watch the video:
Click here If you cannot see the video.


0 Comments
Comments powered by Disqus