


When we first bought the bus, the ceilings were covered in a dingy fabric/carpet type material commonly called “mouse fur”. It was gross. That’s all I can say about that. Gross! I imagined bright, clean white wood planks. While we quickly ripped out those old “mouse fur” panels, it would be a long while before we could start covering the ceiling back up.

The time had finally come to start the ceilings back in the kids’ room in the rear of the bus. Throughout the bus, we plan on using ½” plywood cut into 4” planks with chamfered edges for our ceiling and wall planks. These will be attached to the furring strips which are attached to all of the ribs of the bus. However, in the very rear of the bus that method presented a problem.
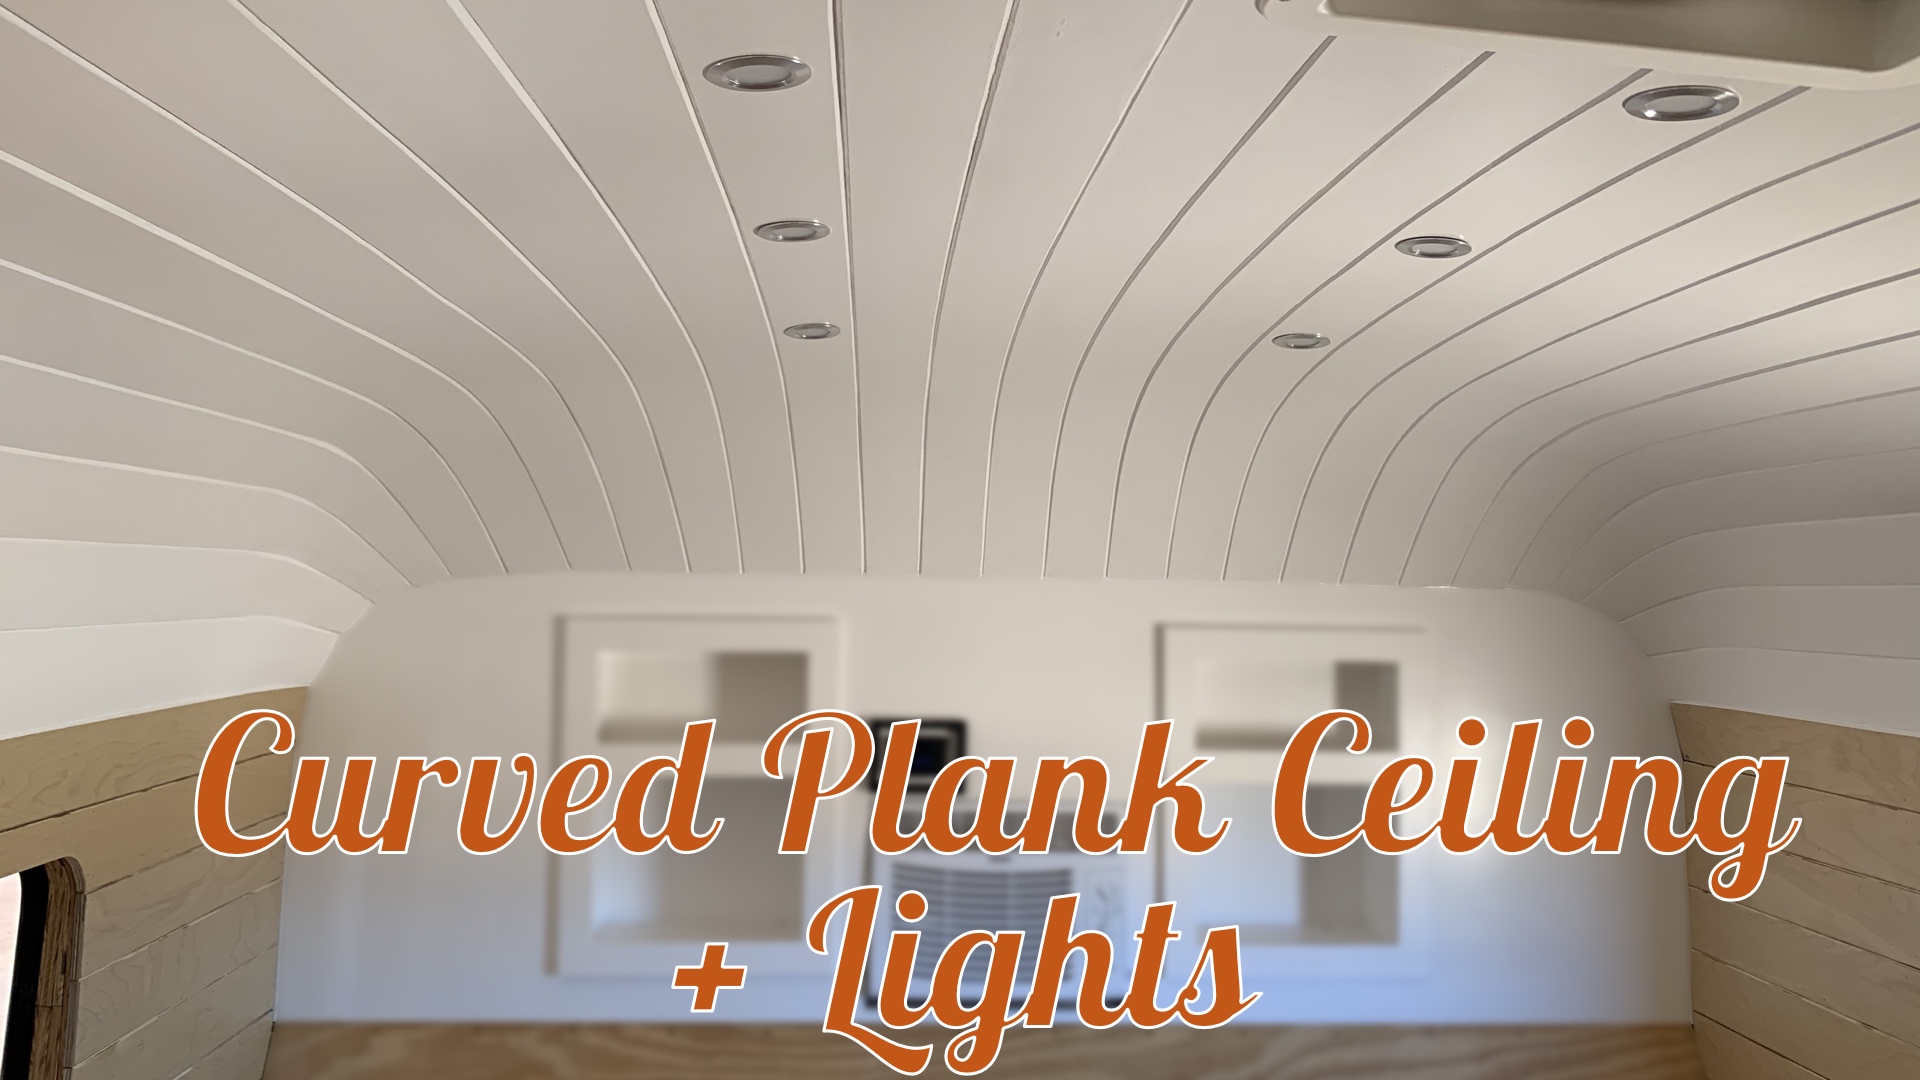
The rear curved part of the bus ceiling is metal. We did not remove this when we demoed the bus. With the monocoque design of the bus, we were concerned about losing structural integrity if we removed the metal back there. The biggest problem that left us was how to cover it without seeing any hardware.

Our vision of clean, white planks did not include seeing a bunch of screws. We wanted it all to look smooth. Everywhere else in the bus, we will be able to glue and brad-nail the planks into the furring strips. Over the metal, however, that wasn’t a possibility. In addition, the curves back there are very steep. The ½” plywood we are using everywhere else would not bend that much without an extreme amount of kerfing.
In order to solve the two problems (not seeing any hardware, severe curves and bends), we chose to use two ¼” layers of plywood. First, this is much easier to bend. Second, we could screw the first layer into the metal with countersink screws. Then, the second layer could be glued and brad-nailed into the first layer in the same way we are using the furring strips everywhere else.
Once we made that plan, we had to figure out not only how to bend the wood, but also taper it to fit. The corners of the rear are like the inside of a ball - curves coming in together in three different directions. Each plank piece had to be custom cut in order to bend the pieces into the curves and corners. In the video, we show how we used a piece of scrap wood as a template to figure out the taper of each piece.
Finally, we had a plan and got started with the underlayer. It was all very slow-going and tedious. Use the template, make marks, take a ton of measurements, transfer those measurements onto a board, cut the taper into the wood, take it in for a test fit. If all went well, we could screw it down. It took three of us to do this project - two to hold each piece, and one to screw it down. Oh yeah...in the very extreme corners where the curves are the most difficult, we did have to use two additional steps. We kerfed the back of the board in the steepest part of the curve. We also lightly sprayed the back of the boards with water using a garden sprayer just before we installed it. This helped the board to bend as much as we needed it to without cracking.


Luckily, the metal part of the ceiling is only about half of the room. The rest is furring strips on ribs. Therefore, we were able to simply glue and nail the rest of the underlayer onto those strips. A couple of additional steps in this underlayer were cutting around our MaxxAir Fan and cutting in holes for the lights and tracks for their wires.

Once the underlayer was all done, it felt so exciting. Even though it wasn’t the finished clean top layer yet, the metal, insulation, and furring strips were covered. Also...I felt like we were inside of an apple basket. Ha!

For the second ¼” layer of plywood, we painted it all white and chamfered the edges to give it the look of tongue and groove without it being actual tongue and groove (just like the walls). Again, we custom cut each piece but this time we were able to glue and nail up each piece, nailing into the side of the groove. Also again, this was very tedious work. We made many trips in and out of the bus fine-tuning each piece to fit just the way we wanted and using the hole saw to cut in the holes for the lights.


After all of the planks for the upper layer were installed, we celebrated just a little bit. The worst of it was done, but it wasn’t actually finished. We still had to wire up the lights, caulk a small bit in the grooves to help it look perfectly clean with no tiny gaps, and paint all the grooves.
For the lights, we are using small 12V LED puck lights with aluminum housing. They are less than ½” thick, so they fit perfectly in our ½” ceiling. We chose to use Warm 3000K lights to give a warmer glow and not make the bus look like an interrogation room. We had previously run all of our wires for the lights, so now all we had to do was solder the leads from the puck lights to our wiring, using marine-grade heat shrink. Then, we just pushed the excess wire up into the ceiling and popped the lights into place.


After caulking and painting the grooves, we stepped back and took a look. Honestly, it looked better than we had even imagined way back when we bought the bus with all that “mouse fur”. The curves look really cool! You can’t see any screws or nail holes or anything! It’s clean, smooth, bright white. It was such a relief to have this particular project done. We were thrilled with how it turned out, and finally it felt like we had a little shell of a room.
Next up: Building bunk beds!
Watch the video:
Click here If you cannot see the video.


0 Comments
Comments powered by Disqus